 |
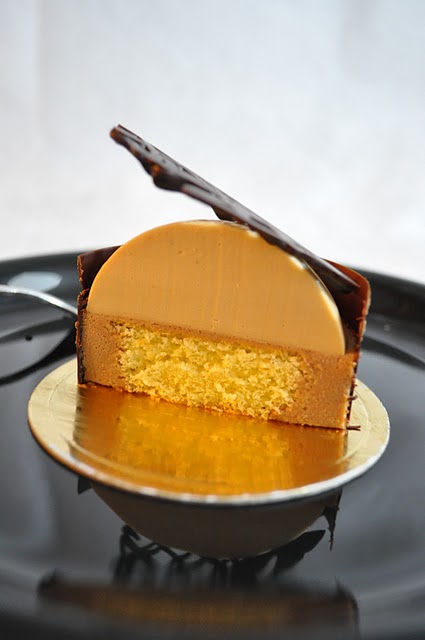
| Earl Grey Tea & Baileys Milk Chocolate Mousse Cake |
This recipe makes 8 individual cakes using 6-cm cake rings and dome molds.
Ingredients:
- For the butter genoise
- 2 eggs
- 40g plain flour, sifted
- 40g sugar
- 20g unsalted butter
- For the baileys milk chocolate mousse
- 130g whipping cream
- 80g milk couverture
- 20g baileys liquor
- 2.5g gelatin
- For the earl grey tea mousse
- 175g whipping cream
- 125g fresh milk
- 50g egg yolks
- 40g sugar
- 11g earl grey tea leaves
- 2.5sheets gelatin
 |
| Earl Grey Tea & Baileys Milk Chocolate Mousse Cake |
Methods:
- For the butter genoise
- Preheat oven to 180C.
- Hand-whisk eggs and sugar over bain marie till mixture reaches40C.
- Using an electrical whisk beat eggs and sugar on high speed till fluffy and peaks form.
- Fold flour into egg mixture in 3 batches. (be careful not to over mix)
- Melt butte over bain marie, add a scoop of egg and flour mixture, mix well.
- Fold mixture back into remaining egg and flour mixture and fold gently till batter surface is uniformly shiny.
- Pour into 9-cm round cake tin and bake for 18minutes.
- Let cool before cutting into small 5-cm rounds placed at the bottom of lined 6-cm cake rings.
- For the baileys milk chocolate mousse
- Beat whipping cream on medium speed till soft peak forms, set aside.
- Soak gelatin sheet in cold water for a few minutes till it blooms.
- Melt gelatin sheet over bain marie, then add 1 teaspoon of whipped cream and mix well.
- Keep gelatin mixture over bain marie.
- Melt milk couverture over bain marie. When its fully melted, fold in 1/3 whipped cream, then add in gelatin mixture and mix well.
- Fold in remaining 2/3 whipped cream into mixture, then gently mix in baileys.
- Pour mousse into lined cake rings over butter génoise.
- Leave for about 2 hours in refrigerator till set.
- For the earl grey tea mousse
- Soak gelatin sheets in cold water for a few minutes till it blooms.
- Prepare earl grey milk by boiling earl grey leaves and milk in a small sauce pan.
- Cover sauce pan for 5 minutes after boiling to intensify tea flavor in the milk
- Strain leaves and ensure there is 80g of earl grey milk for the mousse.
- Boil prepared earl grey milk and whipping cream together.
- Whisk egg yolk and caster sugar till frothy, then pour in 1/3 of earl grey mixture and mix well.
- Pour egg mixture back into remaining 2/3 earl grey mixture and boil, stirring constantly, till mixture thickens slightly.
- Add gelatin leaves and mix well.
- Pour mousse into 8 pieces of 6-cm dome molds and leave for about 2 hours in refrigerator till set.
- Assembly
- Remove baileys milk chocolate mousse from cake rings (using hot towel or flame torch).
- Gently remove earl grey tea mousse from dome molds (by carefully dipping bottom of molds in hot water, taking care not to allow water into the mousse) and place each dome on top of each baileys milk chocolate mousse layer.
- Wrap exterior of individual cakes with dark chocolate, leaving top of dome layer visible.
- Top with dark chocolate decoration if desired.
 |
| Earl Grey Tea & Baileys Milk Chocolate Mousse Cake |
Hi very sweet blog....
ตอบลบThe chocolate mousse cake is very nice...
I want now hmmmmm yummmyyyyy......
Bain Maries
Hi, I found your cake recipes quite delightful.. Great photography also! Keep it up!
ตอบลบI'm craving with your cake recipes. I can't wait to taste it.
ตอบลบThanks for taking the time to share this wonderful post with us. These look very delicious and easy to make. Have a great rest of your day and keep up the posts. Chocolate Transfer Sheets
ตอบลบ